Dual Currency on Printed Receipts
Dual Currency on Printed Receipts
Dual Currency on Printed Receipts
Lavu POS receipts can be configured to print dual currencies and the exchange rate to meet the needs of restaurateurs in tourist areas who need to be able to display their primary and secondary currencies.
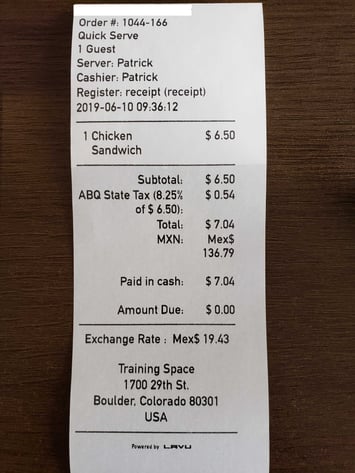
Here is an example of a receipt printed with dual currency displayed:
- The Total displays the amount due in the primary currency. The example pictured shows a primary currency of United States Dollar [USD].
- The next line Pesos [MXN] displays the amount in the secondary currency. This receipt label is determined by you and can be customized to meet your needs.
- The Exchange Rate is displayed below. The exchange rate is set in the backend and updated manually. You have the option of changing the exchange rate from the Lavu POS app if you need to make temporary changes to account for a day that varies greatly from the setting in the control panel.

This article will guide you through the process of:
- Enabling the Feature
- Updating the Exchange Rate in the Control Panel
- Adjusting the Exchange Rate in the Lavu POS app
Enable the Feature
You will need to enable the feature from the Lavu Control Panel. Make sure to have the exchange rate that you will use on hand and that you have already set your Primary Currency Code.
- Login to the Lavu Control Panel
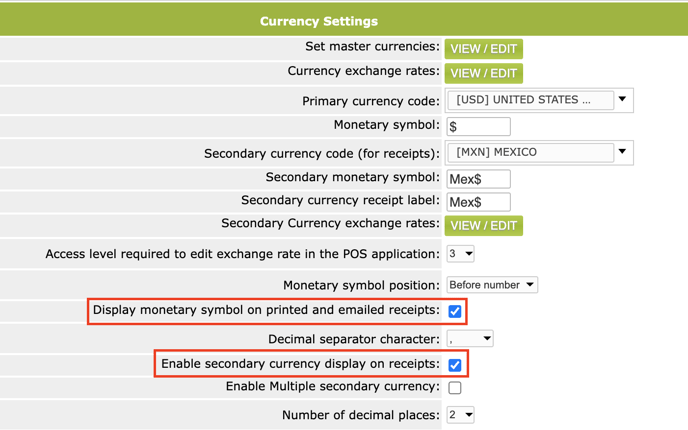
- Navigate to Settings > Location Settings > Advanced Location Settings > Currency Settings
- Check the box next to Enable secondary currency display on receipts and Display monetary symbol on printed and emailed receipts.

- Select your secondary currency code from the Secondary currency code (for receipts) dropdown

- The Secondary monetary symbol will auto populate.
- Type what you want to print on the receipts for the Secondary currency receipt label

- Click SAVE
Your dual currency printing for your receipts is now set up.
Next, let’s talk about what happens when the exchange rate changes.
Adding/Updating the Exchange Rate
There are two methods to updating the exchange rate.
Control Panel Update
You can change it in the Control Panel by following the steps below. This is best for major changes that will last.
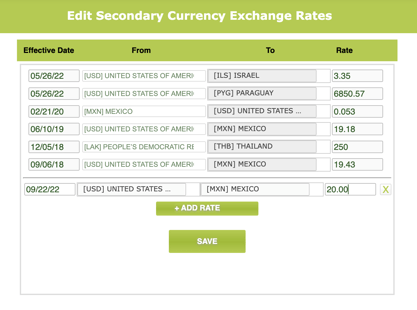
- Click the VIEW / EDIT button next to Secondary Currency exchange rates

- Click + ADD RATE in the Edit Secondary Currency Exchange Rates popup
- Click on the Effective Date text field to set the date for the rate
- Enter the Rate
- Click SAVE

- The popup will close on its own after the page refreshes
- Determine the Access level required to edit exchange rate in the POS application by selecting the appropriate level from the dropdown

- Click SAVE
Adjust the Exchange Rate in the App
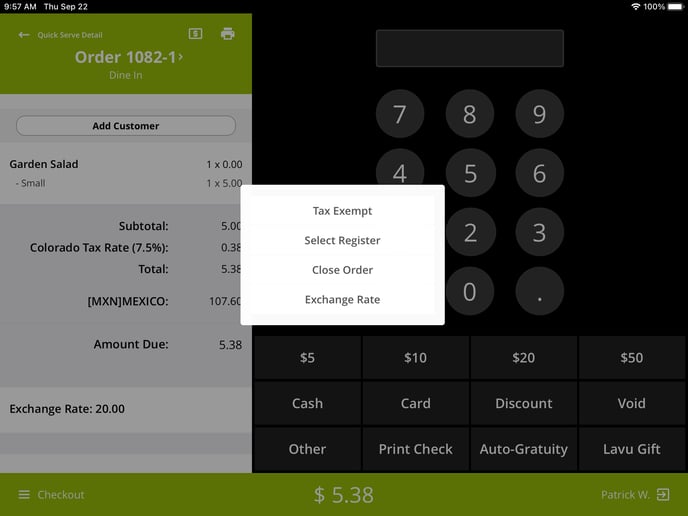
You are also able to change the exchange rate through the app on days where the rate fluctuation is beyond the normal standard deviations and it’s not likely to last more than that one day. This adjustment is done on an order-by-order basis.
Here are the step-by-step instructions:
- Take an order to the Checkout in the app.
- Tap the hamburger button at the bottom left of the screen.
- Tap Functions.
- Tap Checkout Functions.
- Tap Exchange Rate.

- Use the number pad to adjust the rate.

- Tap the Green button.
- Complete the checkout process.