Lavu Customer Facing Display
The Lavu Customer Facing Display displays items, taxes, and check totals to the restaurant patron and can capture signatures for credit card transactions. You will need to have an additional iPad connected to your network with the Lavu Display App installed. You cannot run the Lavu Display App and the Lavu POS on the same iPad.
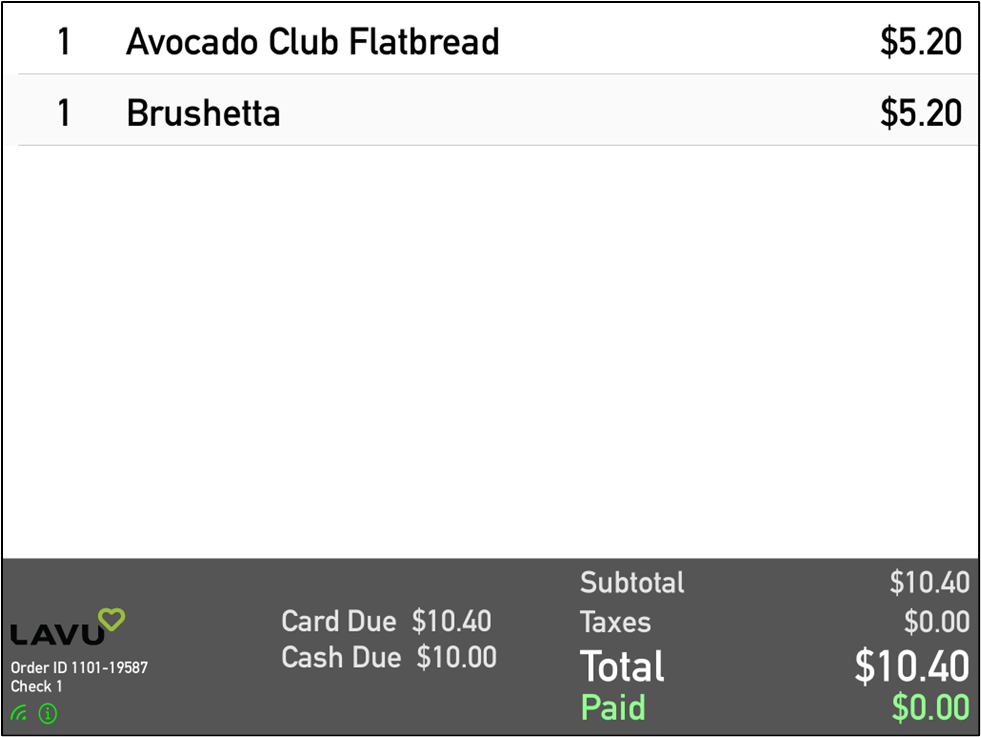
Below is the checkout screen on Lavu POS.

Below is the customer-facing display screen on the Lavu Display App.
Setup
The following instructions will walk you through setting up the Customer Facing Display application:
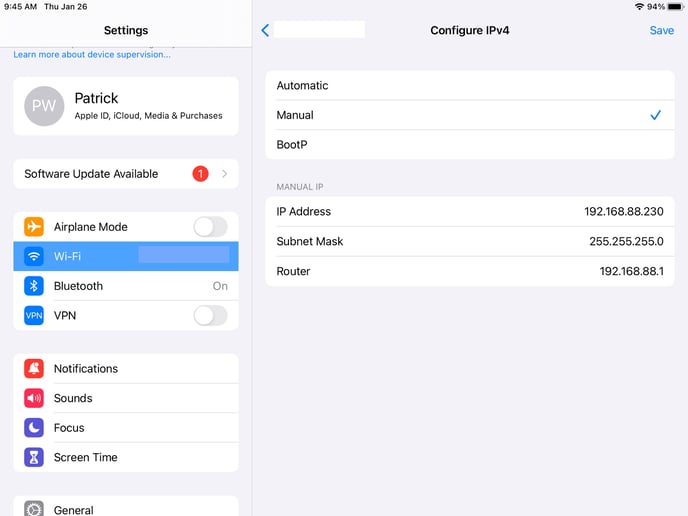
You will first need to set the iPad to have a static IP address. Prior to doing this, you will need to know the DHCP range of your router. You will need to select an IP address that is outside of the range. If your default range is x.x.x.2 through x.x.x.254, you will need to know how to adjust it. If you do not know how to contact your Lavu Specialist or IT Professional to set this range for you.
If you have this information, please follow the instructions listed bellow.
Setting an iPad to a static IP address:
-
Open up Settings on the iPad
-
Tap on the Wi-Fi button on the left side menu settings
-
You should be on your Lavu POS Wi-Fi network. To the right side of your network name you will see a blue circle with an “i” in it. Tap on it.
-
Scroll down on the right until you see "IPV4 ADDRESS". Tap on Configure IP.
- Select Manual.
-
At this point, you will need to know your router's DHCP range, as previously mentioned. You will want to select an IP address that is outside that range.
- Enter in the IP address, Subnet Mask, and router IP address. Below is an example and may NOT be applicable to your own network. Reach out to Lavu support if you need help determining what to enter here.
-
Now that these fields are filled in tap on the “<Wi-Fi” button in the top left of the of the Wi-Fi settings section. This will save the info you just entered.
Mapping the POS Application to the Customer Facing Display:
-
Open the Lavu POS application on another device.
Note: You cannot run the Customer Facing Display on the Same iPad as the Lavu application at the same time. -
Once logged in or pinned into the Lavu application, tap the hamburger menu icon on the bottom left hand of the app.
- Choose Settings.
-
Choose Printers & Displays.
-
Tap on the Customer Facing Display option, located at the bottom of the list.
-
The Customer Facing Display Configuration box will appear, tap the Enabled option, so that the slider is highlighted green.
-
Ensure Display type is set to Lavu.
-
Under “Current IP Address,” tap on “Not Set.”
-
A keypad will appear, enter the IP address of the device running the “Customer Facing Display application.”
-
Select if you would like to capture signatures on the customer-facing display or not.
- Review your settings, if satisfied, tap away from the “Customer Facing Display Configuration Box” to apply your settings.

-
Ensure the Customer Facing Display iPad is on and running the Customer Facing Display Application.
-
Create an order on the newly paired iPad and ensure the order contents are now appearing on the Customer Facing Display. (The items will appear as they are added to the order. A saving action is not required).
For any further support, please reach out to our 24/7 customer support team at 505-535-5288 or email support@lavu.com.