Set a Static IP address for your Epson Printer
A short article showing you how to set a static IP address to an Epson printer.
Setting a static IP address for your kitchen and receipt printers is highly recommended for a number of reasons.
- Network stability
- Easier troubleshooting
- Prevents any issues from occurring after network outages
This may sound like a complicated process, but Epson makes the process of setting a static IP address easy.
Simply download their EpsonNet Config tool (available for Windows and MacOS) from their website.
Once downloaded, you can open up the tool, and it will automatically start scanning your network for any Epson products. This can take a couple of minutes to find all of your printers. If it does not find your printers, you can click the button labeled Refresh.

Once the program has found a printer, you can double click on it to bring up settings that will allow to set a static IP address.

Note: If you are prompted to enter a password, it will either be "12345678", or the printer's serial number, which can be found on either the side or the bottom of the printer.
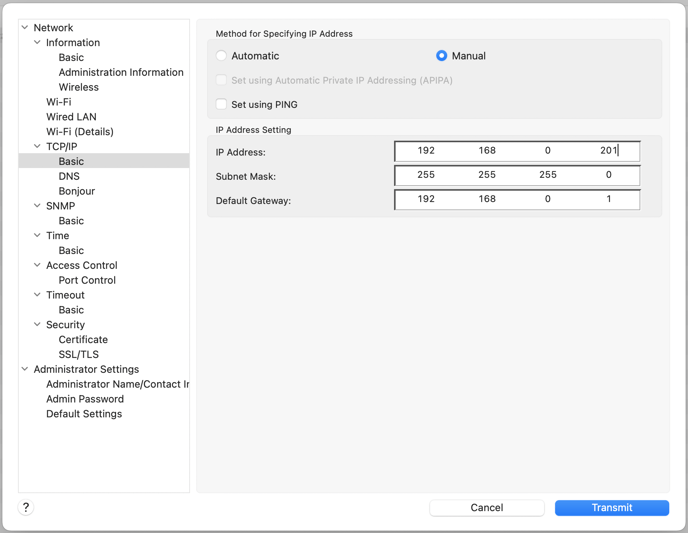
On the left hand side, click on Basic under TCP/IP. Ensure Manual is selected, and enter an IP address. You should only have to edit the last number of the IP address. The Subnet Mask and Default Gateway should be entered for you, and should not change.

When giving your printers IP addresses, we recommend setting your first printer to end in 200, and going up by 1 number for each new printer added. In my example above, 201 would be the address I give to my second printer.
Click the blue Transmit button, and allow a couple minutes for your printer to restart. Now your printer will have a static IP address set that will not change unless the printer is factory reset.